
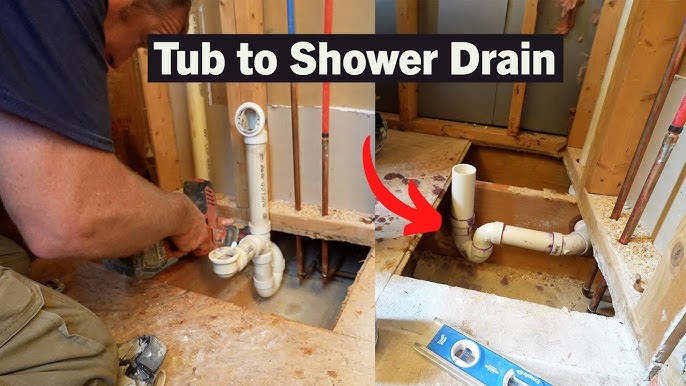
Finding How to Plumb a Shower Drain? Plumbing a shower drain might seem tricky, but it’s manageable with the right steps. You can do it yourself and save money.
Understanding how to plumb a shower drain is important for a functional bathroom. Water needs to flow smoothly to avoid clogs and leaks. This task involves connecting pipes, ensuring proper slope, and sealing joints correctly. With some basic tools and patience, you can handle this project.
This guide will explain each step in simple terms. By the end, you’ll have the knowledge to plumb a shower drain confidently. Ready to get started? Let’s dive in and tackle this together.
Credit: terrylove.com
Tools And Materials Needed
You will need a few basic tools. A pipe wrench is very important. You also need a hacksaw and tape measure. Pliers and a screwdriver will also help. A level ensures everything is straight. These tools are easy to find in stores.
PVC pipes are the main materials. You will also need PVC glue and primer. A shower drain assembly is required. Pipe fittings and Teflon tape are useful. Ensure you have safety gloves and goggles.
Preparing The Work Area
Clear the workspace of any obstacles and debris. Ensure all necessary tools and materials are within easy reach.
Clearing The Space
First, clear the work area. Remove all items from the shower. This includes shampoos, soaps, and other products. Make sure the floor is clean and dry. A clean space helps you work better. It reduces risks of accidents or mistakes.
Safety Precautions
Always think about safety. Wear gloves to protect your hands. Use safety goggles to protect your eyes. Turn off the water supply before you start. Water leaks can make the job harder. Keep tools organized and within reach. This helps you work faster and safer.
Removing The Old Drain
Turn off the main water supply. This stops water flow. Find the main valve. It is usually near the meter. Turn the valve clockwise to close. Ensure no water flows from faucets. This is important for safety.
Loosen the screws holding the drain cover. Use a screwdriver for this. Lift the cover off. Next, remove any visible screws or bolts. Use pliers to grip tightly. Gently pull the drain assembly out. Be careful not to damage the pipes.
Installing The New Drain
First, align the drain pipe with the drain hole. Make sure it fits snugly. Check that the pipe is straight. This avoids leaks. Adjust the pipe if needed. Once aligned, proceed to the next step.
Use a wrench to tighten the drain. Do not over-tighten. This can cause damage. Ensure a firm fit. Check for any gaps. Apply plumber’s putty around the drain. This creates a water-tight seal. Let it dry before using the shower.
Connecting The Plumbing
Learn how to plumb a shower drain effectively. Follow simple steps to connect pipes, ensuring a leak-free installation. Enjoy a hassle-free shower experience.
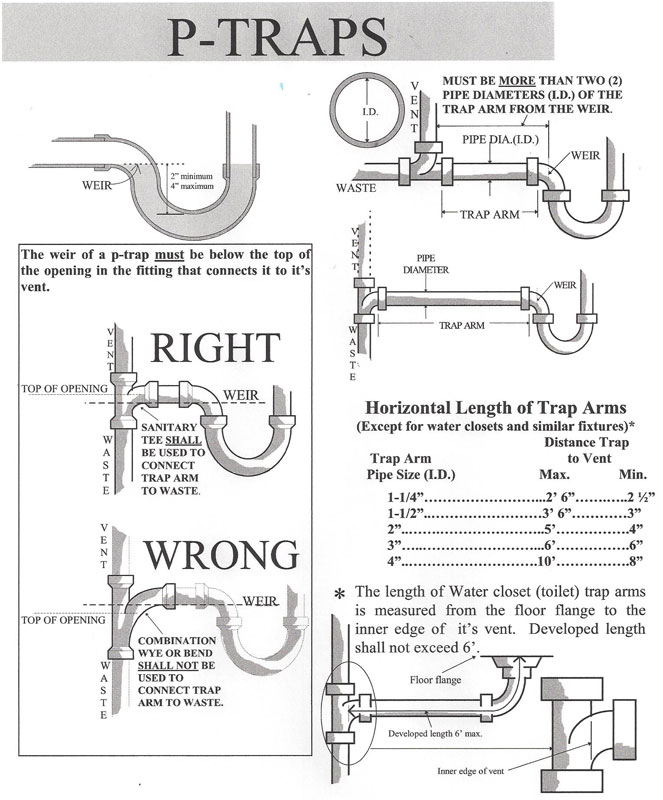
Attaching The P-trap
First, clean the pipe ends. Ensure there are no debris or dust. Next, take the P-trap and connect it to the shower drain. Tighten the nuts with your hands. Make sure the P-trap is aligned. It should face the main drain line. Use plumber’s tape for a secure fit. This will prevent leaks. Finally, double-check the connections. They should be tight but not overly tight.
Connecting To The Main Drain
Locate the main drain pipe. It is usually larger in diameter. Attach the P-trap to this pipe. Use a coupling for this connection. Make sure the coupling is secure. Tighten the nuts again. Ensure there are no gaps. Test the connection with water. Look for leaks. If there are no leaks, the connection is good. If there are leaks, tighten the nuts a bit more.
Testing For Leaks
Ensure there are no leaks by running water through the drain. Check all joints and connections for drips.
Running Water Test
Turn on the water and let it flow for several minutes. Check for any signs of water escaping from the drain. Look for drips or puddles around the drain area. Make sure to inspect all visible pipes and connections. Use a flashlight to see better in dark areas. If you see any leaks, tighten the connections. Still leaking? You may need to reseal the joints. It’s important to fix all leaks to prevent water damage.
Inspecting For Leaks
Dry all areas around the shower drain. Use a dry cloth to ensure all areas are moisture-free. After drying, run the water again. Check for moisture or drips around the drain and pipes. Feel around the joints and connections for any dampness. If you find any, mark the spot. Leaks can sometimes be tricky to spot, so be thorough. Fixing leaks promptly prevents bigger problems later.
Sealing And Finishing
First, clean the area around the drain. Make sure it is dry. Apply a thin layer of sealant around the drain. Use a caulking gun for even application. Smooth the sealant with a wet finger or tool. Allow the sealant to dry completely. This could take a few hours. Check the instructions on the sealant tube for exact drying time.
After the sealant dries, inspect the area. Make sure there are no gaps. Tighten any loose screws on the drain cover. Test the drain by running water. Look for leaks around the sealant. If water leaks, apply more sealant and let it dry. Recheck for leaks. Repeat until no leaks are found.

Credit: www.familyhandyman.com
Troubleshooting Common Issues
Fixing a shower drain involves checking for clogs, leaks, and ensuring proper installation. Tighten connections and clean debris to maintain smooth water flow.
Slow Drainage
Clogged drains cause slow water flow. Hair and soap scum build up over time. Remove the drain cover. Use a plumbing snake to remove blockages. Pour hot water down the drain to clear it. Use a drain cleaner if the problem persists. Regular cleaning prevents clogs.
Persistent Leaks
Check all connections for loose fittings. Tighten any loose nuts or bolts. Inspect the drain trap for cracks or damage. Replace if needed. Ensure the drain gasket is properly seated. Apply plumber’s tape to threads for a better seal. If the leak continues, consult a professional plumber.

Credit: m.youtube.com
Frequently Asked Questions
How Do You Install A Shower Drain?
First, measure and cut the drain hole. Attach the drain assembly to the pipe. Ensure it’s secure and leak-free.
What Tools Are Needed To Plumb A Shower Drain?
You need a pipe wrench, screwdriver, drain assembly, plumber’s putty, and a hacksaw. Additional tools might be required based on your setup.
How Long Does It Take To Plumb A Shower Drain?
Typically, it takes about 1-2 hours. This depends on your plumbing experience and the complexity of the setup.
Can I Plumb A Shower Drain Myself?
Yes, you can. However, basic plumbing knowledge is required. If unsure, consider hiring a professional plumber.
Conclusion
Plumbing a shower drain can seem daunting, but it’s manageable. Follow the steps carefully. Gather all tools and materials beforehand. Ensure proper alignment of pipes. Tighten connections securely to avoid leaks. Test the system thoroughly before closing up. A well-installed drain ensures a functional shower.
Remember, patience and precision are key. Don’t rush the process. With these tips, you can tackle the task confidently. Your bathroom upgrade is just a few steps away. Enjoy your new, efficient shower setup!
Related posts:
 Best Shower Benches: Top Choices for Comfort and Safety
 Best Shower Cap to Keep Hair Dry: Top Waterproof Choices for Women
 Best Shower Drain for Long Hair: Say Goodbye to Clogs Today!
 Best Shower Faucet Set: Top Picks for a Luxurious Bathroom Upgrade
 Best Metal Shower Head: Top High Pressure Options for Ultimate Shower Experience
 Best Shower Filter for Hair And Skin: Top Vitamin-Infused Choices
 A Boys Taking a Shower: Essential Hygiene Tips for Teenagers
 How Many Gpm is a Shower: Understanding Water Flow Rates
 What is a Roll in Shower: A Complete Guide to Accessibility
 How Much Weight Can an Acrylic Shower Hold: Surprising Facts